Free Amigurumi Fox Pattern
Bright orange, a crisp white muzzle and belly, dark paws, and a proper fluffy tail — a fox with just enough color-blocking to feel like a real design project.
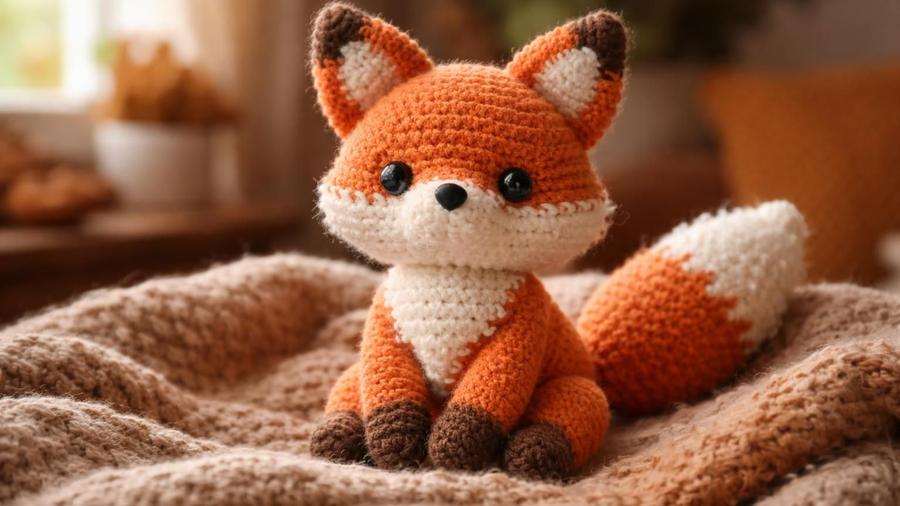
The fox was the pattern that finally taught me the trick of sewn-on color patches, and I wish someone had shown it to me years earlier. I spent an embarrassing amount of time trying to change yarn colors mid-round to get a clean white muzzle on an early amigurumi fox, and the color change line always ended up jagged and visibly stepped, never the crisp curve I wanted. The moment I gave up on doing it in the round and just crocheted a small white oval separately to sew on top, the whole face came together in about five minutes.
That's the approach this pattern uses throughout: the body shapes are worked in a single color for clean, even stitches, and the white muzzle and belly are small flat patches stitched on afterward. The only true in-the-round color change is on the tail tip and the paws, where the color boundary happens to fall exactly on a round, which makes it simple to do cleanly.
Below is the full pattern in US terms, along with notes on getting the color patches placed evenly, building a properly fluffy tail, and the mistakes that make a two-color amigurumi look messy rather than crisp. If you're new to working with more than one color, the technique here is a gentle introduction before tackling true colorwork.
Materials
- 1–2 skeins worsted-weight yarn in orange
- Small amount of white yarn for the muzzle, belly, and tail tip
- Small amount of dark brown yarn for the paws
- 3.5mm hook (smaller than standard, for tight amigurumi stitches)
- Polyester fiberfill stuffing
- Safety eyes, or embroidery thread for a child-safe embroidered face
- Stitch marker, to track the start of each round
- Scissors and a yarn needle
Abbreviations (US terms)
| Abbr. | Means |
|---|---|
| sc | Single crochet |
| st(s) | Stitch(es) |
| inc | 2 sc in same stitch (increase) |
| dec | Sc 2 sts together (decrease) |
| rnd(s) | Round(s) |
See our abbreviations glossary for the full list including UK terms.
Gauge
Gauge isn't critical here — the goal is tight, even stitches that keep the stuffing from showing through. If you can see stuffing between your stitches, size down your hook.
Notes
- Worked in US terms, in a continuous spiral without joining, the same basic technique as our mini amigurumi ball pattern.
- The muzzle and belly are small separate white pieces sewn on top of the finished orange head and body, rather than true colorwork in the round.
- The tail tip and paw colors change mid-piece on a clean round boundary, which is a simple color change rather than colorwork.
Pattern
Magic ring, 6 sc. (6) → Inc around. (12) → [sc 1, inc] around. (18) → [sc 2, inc] around. (24)
Sc every st around for 5 rounds, no shaping. (24 sts each round)
[sc 2, dec] around. (18) → [sc 1, dec] around. (12) → Dec around, stuffing firmly as you close. (6)
Fasten off, leaving a long tail for sewing to the body.
Magic ring, 6 sc. (6) → Inc around. (12) → [sc 1, inc] around. (18)
Sc every st around for 3 rounds. (18 sts each round)
[sc 1, dec] around. (12) → Dec around, stuffing as you close. (6)
Fasten off, leaving a long tail for sewing to the head.
Magic ring, 5 sc. (5) → Inc around. (10)
Fasten off, leaving a tail. Do not stuff; the muzzle stays a flat oval.
Magic ring, 6 sc. (6) → Inc around. (12) → [sc 1, inc] around. (18)
Fasten off, leaving a tail. Do not stuff; the belly patch stays a flat oval.
In orange, magic ring, 6 sc. (6) → Inc around. (12)
Sc every st around for 6 rounds, stuffing firmly as you go. Switch to white and sc even for 2 rounds. Dec around. (6) Fasten off, leaving a tail for sewing.
Magic ring, 4 sc. (4) → Inc around. (8)
Sc even for 2 rounds. Dec around. (4) Flatten the piece slightly and fasten off, leaving a tail. Do not stuff.
In orange, magic ring, 5 sc. (5). Sc even for 2 rounds. Switch to dark brown for the final round. Stuff lightly. Fasten off, leaving a tail for sewing.
Sew the body to the bottom of the head. Sew the muzzle patch to the lower half of the face, and the belly patch to the front of the body, centering each one carefully before stitching around the edge. Sew the two ears to the top of the head and the tail to the back of the body. Sew all four legs to the bottom of the body, dark paw ends down. Attach safety eyes and a small dark nose before stuffing the head if using them, or embroider both with yarn once assembly is complete for a child-safe alternative.
Placing the color patches
Because the muzzle and belly are separate pieces, their placement is entirely up to you when you sew them on, which is both the advantage and the risk of this technique. Center the muzzle patch on the lower half of the face before stitching it down permanently, checking from directly in front that it sits evenly between where the ears will go. Do the same for the belly patch on the body, laying the head and body side by side to compare proportions before committing to any stitches. Pin or baste each patch in place first if you're not confident sewing it directly; a few loose holding stitches are easy to remove and redo if the placement looks off once you step back and look at the whole piece.
Building a fluffy tail
A fox's tail is arguably the most recognizable part of the whole animal, so it's worth stuffing it more firmly than you would the legs or ears. A firmly stuffed tail holds a fuller, rounder shape that reads as fluffy rather than limp, and the white tip worked as a true round color change gives it that classic two-tone fox-tail look without any patches needed, since the color boundary here falls cleanly on a full round. If your yarn has any brushed or fuzzy texture to it, gently brushing the finished tail with a soft pet slicker brush will raise the fibers slightly and add even more visual fluff.
Sizing up or down
To make a larger fox, add one more increase round to both the head and body before their straight rounds, and one more decrease round at the end of each; lengthen the tail and legs by a round or two so the proportions stay balanced, and scale the muzzle and belly patches up with one extra increase round each. For a smaller fox, do the reverse throughout.
Common mistakes & fixes
Fix: use small, even stitches spaced closely around the entire edge of the patch rather than a few widely spaced anchor stitches, and avoid pulling the sewing yarn too tight, which can cup the patch instead of laying it flat.
Fix: make sure the color change happens on the very last stitch of the round before switching colors, so the new color begins cleanly at the start of the next round rather than partway through one.
Fix: switch to the dark brown yarn at the exact same round on every leg, and count stitches at the color change to confirm each paw section covers the same number of rounds.
Fix: sew the muzzle patch on first and let it dry into place, then use its edges as a visual guide for placing the eyes evenly on either side, rather than placing the eyes first and fitting the patch around them.
Fix: stuff the tail more firmly than the other pieces; a fox tail benefits from noticeably more stuffing than a leg or ear of a similar size.
Our pick
Fairfield Poly-Fil Premium Fiber Fill, 32oz
Enough for this fox and future amigurumi projects, staying fluffy without clumping over time.
View on Amazon →Frequently asked questions
Is this amigurumi fox pattern safe for young children?
For children under 3, or any child who still mouths toys, embroider the eyes and nose with yarn instead of using plastic safety eyes, and securely fasten and reinforce the ears, tail, and legs, since these are all small attached parts that carry a choking risk if they come loose. Adult supervision is recommended for young children with any small-parts toy. See our guide to attaching safety eyes for more detail.
How long does this amigurumi fox take to make?
Between the head, body, tail, two ears, and four legs, plus the sewn-on muzzle and belly patches, most confident beginners finish this fox over three to four sessions, roughly 4 to 5 hours of crochet time plus assembly.
How do I get the fox's white muzzle and belly without changing colors mid-round?
Rather than switching yarn color partway through a round, which is difficult to do cleanly on a curved surface, this pattern works the white muzzle and belly as small separate flat pieces in white yarn, then sews each one onto the finished orange head and body. It's a much easier way to get a crisp, clean color block than true colorwork in the round.
How do I make the tail look fluffy?
Stuff the tail firmly rather than lightly, since a well-stuffed tail holds a rounder, fuller silhouette that reads as fluffy. Brushing the finished tail gently with a soft pet slicker brush, if your yarn is a fluffy or brushed acrylic, will also raise the fibers slightly for extra texture.
What's the best stuffing for an amigurumi fox?
Polyester fiberfill is the standard choice for amigurumi because it stays soft, keeps its shape, and is washable and hypoallergenic, unlike natural fiber stuffing that can clump or felt with handling over time.
Can I make the fox bigger or smaller?
Yes. To scale it up, add one more increase round to the head and body before the straight rounds and one more decrease round at the end, and lengthen the tail and legs by a round or two to keep proportions balanced. For a smaller fox, do the reverse.
Why does my fox's face look uneven once the muzzle patch is sewn on?
This is almost always because the patch was sewn on before the eyes were placed, making it hard to judge symmetry. Attach the muzzle patch first, then place the eyes afterward using the patch's edges as a visual guide for even spacing.
CrochetGuides is a participant in the Amazon Services LLC Associates Program. As an Amazon Associate we earn from qualifying purchases, at no extra cost to you.