Free Amigurumi Penguin Pattern
A round black-and-white body, a small folded orange beak, and flat webbed feet built to stand on their own — a proper little penguin, not just a black ball with a face.
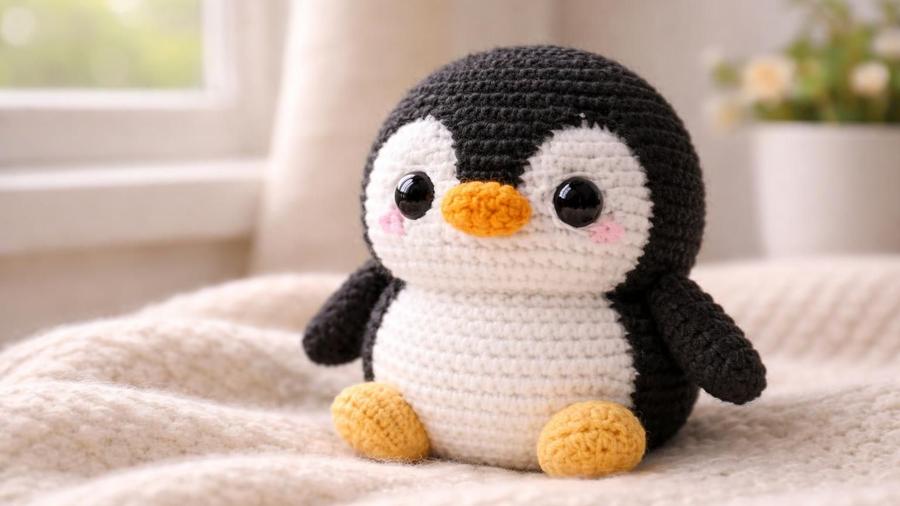
The first amigurumi penguin I ever made stood up for about four seconds before slowly tipping over onto its face, over and over, no matter how I adjusted the stuffing. It turned out the problem wasn't the stuffing at all; it was the feet. I'd been sewing them on pointing straight down like a typical amigurumi leg, when what a penguin actually needs is flat, wide feet angled slightly forward, the same way a real penguin's feet work to keep it balanced.
Once the feet were right, the rest of the pattern came together easily. The body uses standard amigurumi shaping in solid black, and the crisp white belly is a separate patch sewn on afterward rather than something crocheted in place, which avoids the jagged color-change line you'd get trying to switch yarn colors partway through a round. The beak is a small folded triangle, which gives it a bit of real dimension instead of lying completely flat against the face.
Below is the full pattern in US terms, along with notes on getting the penguin to stand up properly, folding a clean beak, and the mistakes that make a penguin topple over or look flat. If you're new to amigurumi shaping, our amigurumi for beginners guide covers the basics first.
Materials
- 1–2 skeins worsted-weight yarn in black
- Small amount of white yarn for the belly patch
- Small amount of orange yarn for the beak and feet
- 3.5mm hook (smaller than standard, for tight amigurumi stitches)
- Polyester fiberfill stuffing
- Safety eyes, or embroidery thread for a child-safe embroidered face
- Stitch marker, to track the start of each round
- Scissors and a yarn needle
Abbreviations (US terms)
| Abbr. | Means |
|---|---|
| ch | Chain |
| sc | Single crochet |
| st(s) | Stitch(es) |
| inc | 2 sc in same stitch (increase) |
| dec | Sc 2 sts together (decrease) |
| rnd(s) | Round(s) |
See our abbreviations glossary for the full list including UK terms.
Gauge
Gauge isn't critical here — the goal is tight, even stitches that keep the stuffing from showing through. If you can see stuffing between your stitches, size down your hook.
Notes
- Written in US terms, worked in a continuous spiral without joining, the same basic technique as our mini amigurumi ball pattern.
- The belly is a separate white patch sewn onto the finished black head and body, rather than true colorwork in the round.
- The feet are worked flat and unstuffed so they can sit flush against the floor for stability.
Pattern
Magic ring, 6 sc. (6) → Inc around. (12) → [sc 1, inc] around. (18) → [sc 2, inc] around. (24)
Sc every st around for 5 rounds, no shaping. (24 sts each round)
[sc 2, dec] around. (18) → [sc 1, dec] around. (12) → Dec around, stuffing firmly as you close. (6)
Fasten off, leaving a long tail for sewing to the body.
Magic ring, 6 sc. (6) → Inc around. (12) → [sc 1, inc] around. (18)
Sc every st around for 4 rounds. (18 sts each round)
[sc 1, dec] around. (12) → Dec around, stuffing as you close. (6)
Fasten off, leaving a long tail for sewing to the head.
Magic ring, 6 sc. (6) → Inc around. (12) → [sc 1, inc] around. (18) → [sc 2, inc] around. (24)
Fasten off, leaving a tail. Do not stuff; the belly patch stays a flat oval, large enough to span both the head and body once sewn on.
Row 1: ch 2, 4 sc in the 2nd ch from the hook. (4)
Row 2: ch 1, turn, [sc 1, dec] twice. (3)
Row 3: ch 1, turn, dec, sc 1. (2) Fasten off, leaving a tail. Fold the triangle in half along its center and tack the folded point with a couple of small stitches.
Chain 6. Row 1: sc in the 2nd ch from the hook and each ch across, turn. (5 sts)
Rows 2–5: ch 1, turn, sc in each st across. Fasten off, leaving a tail. Do not stuff; flatten the strip slightly.
Magic ring, 5 sc. (5) → Inc around. (10) Fasten off, leaving a tail. Do not stuff; flatten into a wide oval "webbed" shape.
Sew the body to the bottom of the head. Sew the white belly patch centered down the front, spanning both the head and body in one continuous piece. Sew the folded beak to the face, straight top edge attached, so the folded point projects outward. Sew the two flippers to the sides of the body. Sew the two feet flat to the bottom of the body, angled slightly forward, so the penguin can stand on its own. Attach safety eyes before stuffing the head if using them, or embroider a simple face with yarn once assembly is complete for a child-safe alternative.
Getting the penguin to stand
A penguin's whole charm depends on it standing upright on its own, and that comes down almost entirely to the feet. Work them flat and wide rather than small and round, since a wider base gives more stability, and when you sew them to the body, angle them slightly forward rather than pointing them straight down. That forward angle mimics how a real penguin's feet work and shifts the toy's center of balance slightly ahead of its body, which is what actually keeps it upright rather than tipping backward.
If your finished penguin still wobbles, check that both feet are the same size and sewn on at exactly the same height; even a small mismatch between the two is often enough to throw off the balance on a toy this compact.
Folding a clean beak
The folded beak technique is simple but makes a real visual difference compared to sewing on a flat triangle. Once your small triangle piece is finished, fold it in half so the two side points meet exactly, then take a couple of small stitches through both layers right at that folded point to hold the fold permanently in place. When you sew the beak onto the face, attach it along its straight top edge only, letting the folded point project outward and slightly downward; that's what gives the beak its slightly three-dimensional, lifelike shape rather than lying completely flat.
Color variations
Classic black and white is the obvious choice for a penguin, but this pattern works just as well in navy with a cream belly for a softer look, or even in a fun non-realistic color combination if you're making it as a playful rather than true-to-life toy. If you'd like rosy cheeks like the ones in the photo, add two small circles of pink embroidery to the face after the eyes are placed, working a few short satin stitches close together rather than a single large stitch for a softer blush effect.
Common mistakes & fixes
Fix: make sure the feet are worked flat and wide rather than round, and sew them on angled slightly forward rather than pointing straight down.
Fix: use small, even stitches spaced closely around the entire edge of the patch, and avoid pulling the sewing yarn too tight, which can cup the patch instead of laying it flat.
Fix: make sure you've folded the triangle and tacked the point before sewing it on, and attach only the straight top edge rather than stitching all the way around the beak's outer edges.
Fix: mark both flipper positions with a scrap of contrasting yarn before sewing either one on, checking placement from directly in front so both sides match.
Fix: work the belly patch with one extra increase round if it's coming out smaller than expected, since it needs enough width to fully cover the intended belly area without any base color peeking through at the edges.
Our pick
Fairfield Poly-Fil Premium Fiber Fill, 32oz
Enough for this penguin and future amigurumi projects, staying fluffy without clumping over time.
View on Amazon →Frequently asked questions
Is this amigurumi penguin pattern safe for young children?
For children under 3, or any child who still mouths toys, embroider the eyes with yarn instead of using plastic safety eyes, and securely fasten and reinforce the beak, flippers, and feet, since these are all small attached parts that carry a choking risk if they come loose. Adult supervision is recommended for young children with any small-parts toy. See our guide to attaching safety eyes for more detail.
How do I make the folded triangle beak?
Work a small flat triangle in orange, fasten off, then fold it in half along its center line so the two side points meet. Tack the folded point down with a couple of small stitches to hold the fold, then sew the folded beak to the face along its straight top edge for a slightly three-dimensional beak shape.
How do I get the clean black-and-white color split on the belly?
Rather than switching yarn color mid-round, which is hard to do cleanly on a curved surface, this pattern crochets the body entirely in black, then crochets a separate white oval patch and sews it onto the front for the belly. It's a much easier way to get a crisp edge than true colorwork in the round.
How long does this amigurumi penguin take to make?
Between the head, body, beak, two flippers, and two feet, plus the sewn-on belly patch, most confident beginners finish this penguin over two to three sessions, roughly 3 to 4 hours of crochet time plus assembly.
What's the best stuffing for an amigurumi penguin?
Polyester fiberfill is the standard choice for amigurumi because it stays soft, keeps its shape, and is washable and hypoallergenic, unlike natural fiber stuffing that can clump or felt with handling over time.
Can I make the penguin bigger or smaller?
Yes. To scale it up, add one more increase round to the head and body before the straight rounds and one more decrease round at the end, and scale the beak, flippers, and feet up with one extra round or row each. For a smaller penguin, do the reverse.
Why won't my penguin stand up on its own?
The feet need to be flat, wide enough for the body's weight, and sewn on with a slight forward angle rather than straight down. If your penguin still tips over, try adding a touch more stuffing to the very bottom of the body just above the feet to weight it slightly.
CrochetGuides is a participant in the Amazon Services LLC Associates Program. As an Amazon Associate we earn from qualifying purchases, at no extra cost to you.