Free Crochet Vest Pattern (Panel Construction)
A simple sleeveless vest worked as three rectangle panels with waist shaping and short-row armholes, seamed at the shoulders and sides.
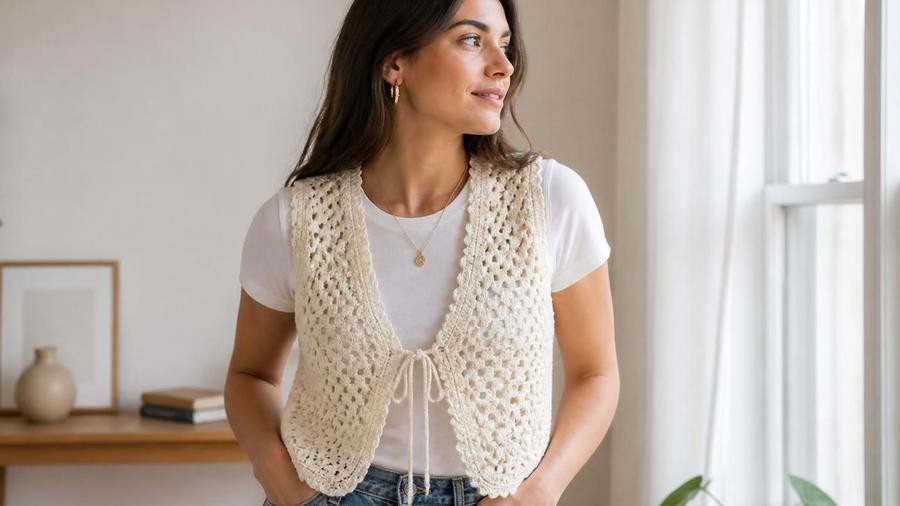
My first vest attempt looked fine on the hanger and completely wrong on an actual body, because the armholes cut in far tighter than the flat panel measurements suggested they would. It's an easy trap: a garment worked flat in panels doesn't show you how it'll actually sit on a moving, three-dimensional shoulder and arm until it's seamed and tried on, by which point a too-tight armhole means unpicking a finished seam rather than adjusting a stitch count.
This pattern covers the three-panel construction, the waist shaping that keeps the silhouette from looking like a straight box, and specifically how to check armhole and neckline fit against a real garment before committing to the final edging, so the fit problem gets caught while it's still cheap to fix.
A vest is also a genuinely good first garment project for someone who's mostly worked flat accessories so far, since it introduces panel construction, waist shaping, and short-row armhole shaping without the added complexity of setting in a sleeve. Once you're comfortable with this three-panel approach, adapting it into a cardigan or pullover mostly means adding sleeve panels to a structure you already understand, rather than starting from an entirely new set of techniques, which makes this a genuinely useful pattern to learn well.
Materials
- About 600–750 yards of worsted or DK-weight yarn, depending on desired drape
- Hook sized to gauge (typically 5.0-5.5mm for worsted)
- Stitch markers, yarn needle, scissors
- Optional: 5-6 buttons for a front closure
Abbreviations (US terms)
| Abbr. | Means |
|---|---|
| sc | Single crochet |
| dec | Decrease |
| inc | Increase |
| st(s) | Stitch(es) |
See our abbreviations glossary for the full list including UK terms.
Notes
- Worked flat in rows, in three separate panels: one back, two fronts.
- Armhole and neckline shaping is done with short-row turning, not cutting into the fabric.
- See our seaming guide for the panel-joining technique used here.
Pattern
Chain to desired width plus 2 for turning. Work even in sc for several inches to the underarm point. Waist shaping: dec 1 st each side every 4th row for 3-4 repeats, then work even, or reverse the order for a flared silhouette. At the underarm, begin short-row shaping: work fewer stitches each row on both ends for 3-4 rows to shape the armhole curves, leaving the center stitches for the shoulders. Fasten off.
Chain to half the back panel's width plus 2. Work the same waist shaping as the back panel, matching row for row. At the underarm, work short-row armhole shaping on the side seam edge only (not the center front edge). Continue upward, then work short-row neckline shaping on the center front edge over the last several rows, angling the neckline in toward the shoulder.
Seam the two front panels to the back panel at the shoulders, matching the shoulder stitch counts exactly. Seam the side edges from hem to underarm using a mattress-stitch-style seam (see our seaming guide), checking fit at the shoulder seam stage before committing to the side seams.
Work 1 round of sc or slip stitch evenly around the entire opening, armholes, neckline, and front edges, in one continuous pass. If adding buttons, work evenly spaced buttonholes into this round on one front edge only. Weave in all remaining ends and block if desired.
Checking armhole and neckline fit
Before finishing the armhole edging, measure the actual opening against the armhole of a well-fitting garment the wearer already owns, not just against the pattern's stated measurement. A flat panel's armhole curve can look correct on paper and still bind uncomfortably once the vest is on a body and the arm is moving, since a flat measurement doesn't account for the fabric needing to wrap around a rounded shoulder joint.
The same check applies to the neckline: hold the unfinished front panels up against the wearer (or a similarly-sized garment) before working the final edging round, and if the neckline looks like it will gape open rather than lie flat, work it slightly shallower than originally planned. It's much easier to adjust the short-row count before the edging locks the shape in than to correct a gaping neckline afterward.
Pin the front and back panels together at the shoulder and side seam points, without actually sewing them, and try that pinned-together approximation on before doing any permanent seaming at all. This "dry fit" step takes a few minutes and catches the majority of sizing surprises that would otherwise only show up after the vest is fully assembled, when correcting them means unpicking real seams rather than repositioning a few pins.
Seaming and edging
A flat seaming method matters more on a garment than on a stuffed toy, since a bulky seam on a vest sits directly against the body and is far more noticeable both visually and physically. Mattress stitch, worked from the right side through matching stitches on each panel, keeps the seam nearly invisible and lies flat rather than creating a ridge. A single-crochet seam worked from the wrong side is a reasonable alternative if mattress stitch feels unfamiliar, though it does add slightly more bulk.
Work the stabilizing edging round in one continuous pass around the entire opening rather than as separate rounds for the armholes and neckline, so the transitions between sections are smooth rather than showing a visible break where one edging round ended and another began.
Seam the shoulders first, before the side seams, and try the vest on (or hold it up against the wearer) at that stage. A shoulder-only seam is quick to unpick and re-seam if the fit looks off, and catching a shoulder-width mismatch before the sides are also seamed saves considerably more unpicking than discovering the same problem once the whole vest is assembled.
Use the same yarn for seaming that you used for the panels themselves, rather than a smoother sewing thread, since matching yarn blends into the fabric visually in a way that a thinner or differently-textured thread won't. If your yarn is particularly bulky or textured, splitting a single ply from a multi-ply yarn for just the seaming pass gives a finer, less bulky seam while still matching the color exactly.
Choosing yarn weight for drape
Worsted weight gives a slightly structured, substantial vest that holds its shape well and suits a layering piece worn over a shirt or sweater. DK weight, being thinner, drapes more softly and suits a vest meant to be worn closer to the body as a standalone top. Since the whole garment is built from flat panels rather than shaped darts, the yarn's inherent drape does a lot of the work in determining whether the finished vest reads as structured or soft, more so than in a garment with more built-in shaping.
A wool or wool-blend yarn holds a blocked shape better than pure acrylic and is worth considering if you plan to block the finished panels to precise measurements, since wool responds more predictably to blocking. A plant fiber like cotton or linen gives excellent drape and breathability for a warm-weather vest, though it has less give than wool or acrylic, so double-check your gauge swatch measurements carefully if switching fibers from what the pattern assumes.
Whichever fiber you choose, work a proper gauge swatch, at least 4in square, in the actual stitch pattern used for the panels, rather than trusting the yarn label's suggested gauge. Since this pattern is built from flat rectangular panels rather than a shaped, curve-fitted construction, an inaccurate gauge translates directly and proportionally into a too-big or too-small finished garment, with no easing shaping elsewhere in the pattern to absorb the difference. See our gauge guide for the full swatching process.
Fit and finishing mistakes
Fix: before finishing the armhole edging, measure the actual opening against the armhole of a well-fitting garment the wearer already owns, not just against the pattern's stated measurement.
Fix: follow the decrease/increase row schedule exactly and count stitches at each marked waist row rather than shaping "by eye."
Fix: count total rows worked on each panel, not just measured length, since gauge can drift slightly between separate pieces worked on different days.
Fix: work a stabilizing round of single crochet or slip stitch directly around the neckline before considering the piece finished, and consider working the neckline slightly shallower than specified if gaping persists.
Fix: use a flat seaming method like mattress stitch or a single-crochet seam worked from the wrong side rather than a bulkier whip stitch.
Our pick for buttons
Wood Toggle Buttons, Set of 6
A sturdy wood toggle button holds securely through a crocheted buttonhole without slipping loose the way a smooth plastic button can, and it adds a natural, finished look that suits a handmade panel-construction vest.
View on Amazon →Vest FAQ
How much yarn is needed per size?
About 600-750 yards of worsted-weight yarn for a small-to-medium size, scaling up by roughly 100-150 yards per size increase in DK or worsted weight.
Can this vest be made seamlessly, worked in one piece instead of separate panels?
Yes, an experienced crocheter can adapt the three-panel construction into one continuous piece worked back and forth, splitting for the armholes and rejoining at the shoulders. It's a more advanced adaptation, though, since tracking two sides' shaping simultaneously is harder than shaping identical pieces separately.
How do I size the pattern up or down for a different bust measurement?
Adjust the panel width (chain length) to one quarter of your actual bust measurement plus 1-2in of ease, keeping the back panel double the width of each front panel. The waist shaping's row placement and stitch counts scale proportionally from that new base width.
What stitch works best for a clean, non-curling edging?
A single round of single crochet or slip stitch worked evenly around the finished opening (armholes, neckline, and front edges) stabilizes the fabric and prevents the curling that single crochet fabric edges are prone to on their own.
Can buttons or a different closure be added to the front?
Yes, work evenly spaced buttonholes (ch 2, skip 2 sts) into one front edging round, and sew buttons to the opposite front panel to match. A simple tie closure or no closure at all (worn open) also works well with this construction.
How do I block a garment like this so it holds its finished shape?
Wet block each panel to its measured dimensions before seaming if possible, pinning it flat and letting it dry fully. Blocking after seaming works too, though pre-blocking individual panels makes it easier to catch and correct a sizing mismatch before the pieces are permanently joined.
CrochetGuides is a participant in the Amazon Services LLC Associates Program. As an Amazon Associate we earn from qualifying purchases, at no extra cost to you.