Free Baby Cardigan Pattern (Hooded, Button-Front)
A sage green hooded cardigan worked top-down from the neck, with true raglan shaping and a button-front closure — a real little sweater, not a rectangle in disguise.
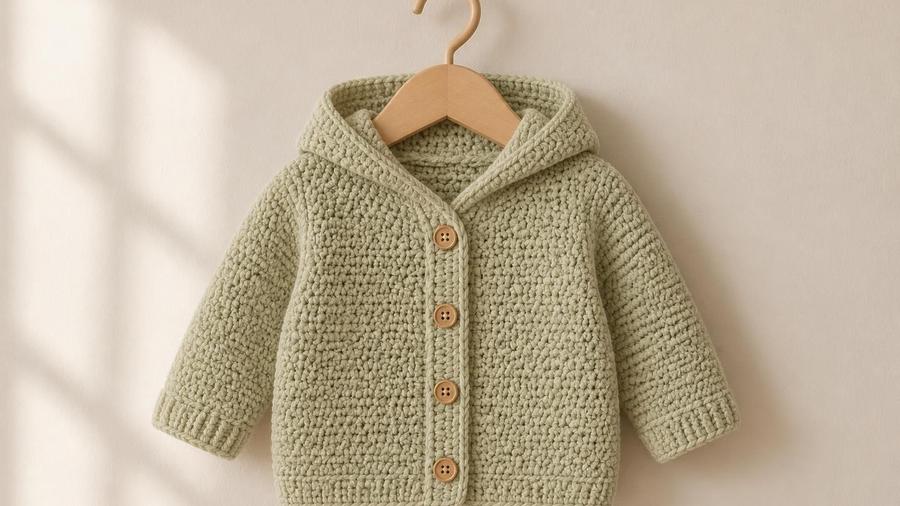
I get asked fairly often whether a baby cardigan is a reasonable first garment to attempt, and my honest answer is yes, with one condition: pick a top-down raglan rather than trying to piece something together from separately worked panels. The top-down method means you can try the whole thing on as you go, adjusting length and depth by eye rather than trusting a chart, which matters enormously when your test subject can't exactly stand still for a fitting.
This cardigan starts at the neck edge and grows downward in one piece, increasing at four points to shape the raglan lines that separate the two front panels, the back, and the two sleeves. Once the yoke is deep enough, the sleeve stitches are set aside and the body continues down to the hem while you're free to make the sleeves as long or short as you like afterward. A folded, seamed hood and a simple button band finish it off.
Below is the full pattern in US terms, along with sizing notes across four age ranges, yarn recommendations, and the mistakes that trip people up the first time they try a raglan shape. If a top-down raglan is new to you, it's worth reading through the whole pattern once before you start, since the shaping logic makes much more sense once you can see the whole shape it's building toward.
Materials
- About 350–500 yards of worsted-weight yarn, depending on size
- 5mm (US H-8) crochet hook
- 4 buttons, about ¾in / 2cm diameter
- Scrap yarn or stitch holders, for setting aside sleeve stitches
- Yarn needle and scissors
- Stitch marker
Abbreviations (US terms)
| Abbr. | Means |
|---|---|
| ch | Chain |
| sc | Single crochet |
| dc | Double crochet |
| st(s) | Stitch(es) |
| inc | 2 dc in same stitch (increase) |
| dec | Dc 2 sts together (decrease) |
| rnd(s) | Round(s) |
See our abbreviations glossary for the full list including UK terms.
Gauge
13 dc and 8 rows measures about 4in / 10cm square with a 5mm hook and worsted yarn. Since this is a fitted garment, swatching first genuinely matters more here than on a blanket or amigurumi piece.
Notes
- Sizes given are 0–3, 3–6, 6–9, and 9–12 months (sizing notes below).
- Worked top-down in one piece to the underarm, then split into body and two sleeves.
- The hood is a folded, seamed rectangle, the same simple technique used on our baby cocoon pattern.
Pattern
Chain 36, join with a slip stitch to form a ring, being careful not to twist. Chain 2 (counts as first dc), dc in same st, place a marker after this pair; this pair marks the first raglan line. Work: dc in next 5 sts (right front), [dc, inc] in next st (raglan 2, mark), dc in next 8 sts (sleeve), [dc, inc] in next st (raglan 3, mark), dc in next 12 sts (back), [dc, inc] in next st (raglan 4, mark), dc in next 8 sts (sleeve), dc in remaining 5 sts (left front). (40 sts)
Continue in the round, working an increase pair (inc, meaning 2 dc in the same stitch) at each of the 4 raglan markers every round, and dc plainly everywhere else. Each round adds 8 stitches. Repeat for 8 more rounds until the yoke measures about 4.5in / 11cm deep from the neck edge. (104 sts)
On the next round, work across the right front and half the back as established. At each sleeve section, place those stitches on scrap yarn or a stitch holder rather than working them, then chain 2 across the underarm gap to bridge to the next section. Continue across the back, place the second sleeve's stitches on holders, chain 2 across that underarm gap, and continue across the left front.
At the end of the dividing round, chain 1 and turn; from here the body is worked flat in rows rather than in the round, since the front stays open. Work even in dc for 12 rows, or until the body reaches the desired length for your size (see sizing notes). Fasten off.
Return to a set of held sleeve stitches. Join yarn and work in the round over these stitches plus the few underarm chain stitches bridging the gap. Work even for 2 rounds, then decrease 1 stitch every other round for 4 rounds to taper toward the wrist. Finish with 2 rounds of single crochet for a snug cuff. Repeat for the second sleeve.
Chain 22. Row 1: single crochet in the 2nd chain from the hook and each chain across, turn. (21 sts)
Rows 2–18: chain 1, turn, single crochet in each stitch across. Fasten off, leaving a long tail. Fold in half and seam along the top and back edge to form the hood's dome shape. Sew the open bottom edge to the neck opening, centered across the back and evenly toward both fronts.
Work a strip of single crochet up the right front edge with 4 evenly spaced 2-chain buttonholes. Work a matching plain strip up the left front edge. Sew on 4 buttons to align with the buttonholes.
Understanding raglan shaping
The four diagonal lines running from the neck to the underarm on a raglan sweater aren't decorative, they're the seams where the body panels and sleeves are joined through shared increases, all worked at once instead of as separate seamed pieces later. Every round, each of the 4 raglan points gains one extra stitch pair, which is what makes the yoke grow wider and, because there are 4 evenly spaced points doing this at once, grow into a rounded shoulder shape rather than a flat disc.
The reason this technique suits a first-ever garment better than it might seem is that the whole shape is visible and checkable as you go. You can lay the growing yoke flat and see whether all four sections look proportional to each other, and you can try it over a baby's head periodically to check the neck opening and yoke depth, adjusting your final round count by feel rather than trusting a chart that assumes an average-sized baby.
Sizing by age
As written, this pattern fits 0–3 months. For 3–6 months, work 2 extra yoke rounds before dividing for sleeves (11 rounds total), add 2 extra body rows, and 1 extra plain sleeve round before the taper. For 6–9 months, add 4 extra yoke rounds, 4 extra body rows, and 2 extra plain sleeve rounds compared to the 0–3 month size. For 9–12 months, add 6 extra yoke rounds, 6 extra body rows, and 3 extra plain sleeve rounds. In every size, try the piece on periodically rather than relying purely on the round counts, since babies vary more in proportions than the size chart suggests.
Choosing yarn and hook size
A worsted-weight yarn with a 5mm hook strikes a good balance for this pattern: warm enough for a genuine outer layer, without so much bulk that a baby's arms feel restricted in the sleeves. Choose a soft, machine-washable fiber, acrylic, a cotton-acrylic blend, or superwash wool are all reasonable choices, and swatch first to confirm your gauge matches, since a fitted garment like this is far less forgiving of a gauge mismatch than a blanket would be. Our hook size chart is useful if you need to size up or down to hit gauge.
Care & washing
Check the yarn label, but most machine-washable worsted yarns tolerate a gentle cycle inside a mesh laundry bag, which protects both the buttons and the hood's seamed edge from catching on anything else. Lay flat to dry rather than hanging, since a wet garment hung by the shoulders can stretch out of shape at exactly the raglan seams that give it its fit.
Common mistakes & fixes
Fix: place a stitch marker at each of the 4 raglan points at the start and count stitches in each section separately every few rounds, rather than only checking the total stitch count.
Fix: make sure you chain exactly 2 stitches across each underarm gap when dividing, and weave in the join carefully on the first sleeve round; a gap that's too wide or too narrow both cause puckering.
Fix: work both sleeves' round counts identically rather than eyeballing length, and lay them flat side by side to compare before weaving in the final ends.
Fix: mark the center back of the neck opening with a scrap of yarn before sewing, and work outward evenly toward both fronts from that center point rather than starting from one side.
Fix: swatch and check gauge before starting; a fitted garment like this amplifies a small tension mismatch far more than a blanket or amigurumi piece would.
Our pick
Lion Brand Pound of Love Yarn
A soft, machine-washable worsted-weight yarn with good stitch definition, well suited to a fitted garment like this cardigan.
View on Amazon →Frequently asked questions
How is this baby cardigan different from your adult cardigan pattern?
The adult cardigan on this site is built from five flat rectangles with no shaping. This baby cardigan is a completely different construction: a top-down raglan worked in one piece from the neck, with true increase-based shaping at four raglan lines and a fitted hood, rather than seamed rectangles.
What does "top-down raglan" mean?
It means the cardigan starts at the neckline and is worked downward in one continuous piece, with the sleeves increased at four diagonal seam lines (the raglan lines) until the yoke is deep enough, at which point the sleeve stitches are set aside and the body and sleeves are finished separately.
What sizes does this pattern cover?
The pattern is written for 0-3 months, with sizing notes for scaling up to 3-6, 6-9, and 9-12 months by adjusting the yoke depth, body length, and sleeve length at the points noted in the pattern.
How do I make the hood without complicated shaping?
The hood is worked as a flat rectangle, then folded in half and seamed along the top and back edge, the same simple technique used on our baby cocoon pattern, rather than shaped with increases or decreases.
What yarn and hook size should I use for a baby cardigan?
A worsted-weight yarn with a 5mm hook gives a fabric that's warm without being stiff or bulky, suitable for layering under a jacket or wearing alone indoors. Choose a soft, machine-washable acrylic, cotton blend, or superwash wool.
How many buttons does the cardigan need?
This pattern uses 4 evenly spaced buttons down the front band. Sew each one on very securely and check periodically, standard care for any baby garment with small hard attachments.
Can I make this cardigan without a hood?
Yes. Skip the hood section entirely and instead work 2-3 rounds of single crochet directly around the neck opening for a simple crew neckline. The rest of the pattern is unaffected.
CrochetGuides is a participant in the Amazon Services LLC Associates Program. As an Amazon Associate we earn from qualifying purchases, at no extra cost to you.