Free Crochet Mittens Pattern (Thumb Gusset)
Warm adult crochet mittens with a proper thumb gusset, a snug ribbed cuff, and a smoothly rounded top rather than a pointed one.
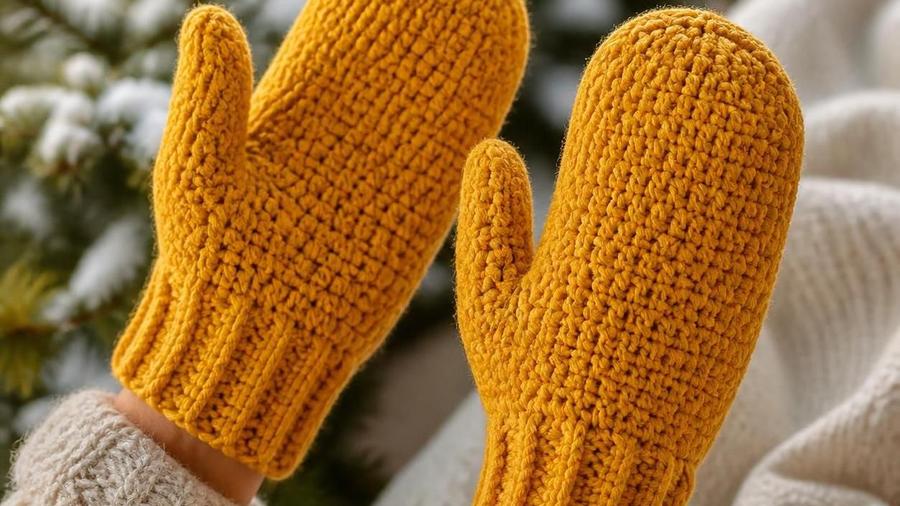
My first pair of crochet mittens had a thumb sewn on as a separate little tube, attached after the fact wherever it happened to look about right. They looked fine sitting flat on a table. The moment I actually tried to wear them, the thumb sat at an angle that fought against how my hand naturally moved, and pulling them on required a small negotiation every single time. A properly worked thumb gusset, increases built directly into the side of the hand as you go, fixes this completely, because the thumb opening ends up exactly where your thumb actually is rather than wherever a separately-made tube got stitched on afterward.
This pattern is built around getting that gusset right: increases worked gradually up one side of the hand, the gusset stitches held on scrap yarn rather than closed off, and the thumb itself worked later once the rest of the mitten is finished. It also covers the ribbed cuff that keeps mittens from sliding down your wrist all winter, and the smoothly rounded top shaping that a lot of quick mitten patterns skip in favor of a faster, pointier finish.
Mittens are also just genuinely practical in a way that's easy to undervalue once you're used to gloves: since there's no individual finger shaping beyond the thumb, your fingers share warmth with each other inside the mitten, which is part of why they're noticeably warmer than gloves of the same yarn weight in genuinely cold weather.
Materials
- About 150–180 yards of worsted-weight wool-blend yarn
- 5mm hook
- Scrap yarn (for holding the gusset stitches), yarn needle, scissors, stitch marker
Abbreviations (US terms)
| Abbr. | Means |
|---|---|
| sc | Single crochet |
| inc | Increase |
| dec | Decrease |
| FPdc/BPdc | Front-post/back-post double crochet |
See our abbreviations glossary for the full list including UK terms.
Notes
- Worked from the cuff up, in continuous rounds, in a worsted-weight wool-blend yarn.
- The thumb gusset is worked directly into the hand, not as a separately-attached tube.
- Check the stated hand circumference against your own hand before starting.
Pattern
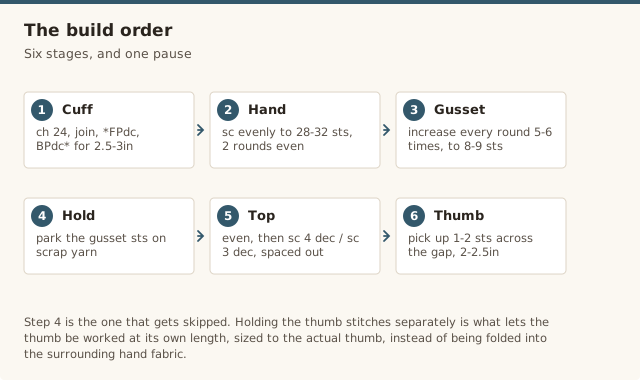
Ch 24 (adjust to fit wrist snugly, in a multiple of 2), join in the round. Work *FPdc, BPdc* around for 2.5-3in of ribbed cuff height.
Switch to plain sc. Rnd 1: sc evenly around, increasing to 28-32 sts total depending on size. Work 2 rounds even.
Rnd: sc to the marked gusset-start point, inc, sc 1, inc, sc to end of round. Work 1 round even. Repeat the increase round (adding 2 sts each time, always with 1 sc between the two increases) for 5-6 rounds total, until the gusset section is 8-9 sts wide.
On the next round, work across the hand sts as usual, then place the gusset's 8-9 sts onto a length of scrap yarn (do not work them), ch 1 over the gap to maintain the stitch count, and continue around.
Work even at the resumed stitch count until the mitten reaches the base of your fingers. Begin gradual decreases: *sc 4, dec* around, work 1 round even, *sc 3, dec* around, work 1 round even, continuing this pattern (one decrease round, one even round) until 6-8 sts remain. Fasten off, cinch closed.
Return to the held scrap-yarn stitches, plus pick up 1-2 sts across the gap for a clean join. Work even in rounds for 2-2.5in, then decrease every round (dec around) until 4-5 sts remain, fasten off and cinch closed.
Working the thumb gusset
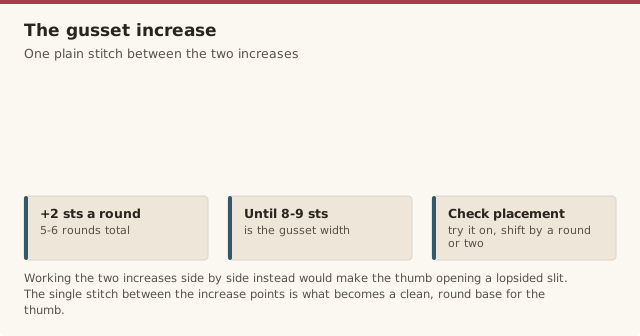
The gusset's whole job is to add just enough extra width at exactly the right spot for a thumb to pass through comfortably, without adding bulk anywhere else on the hand. That's why the increases are placed with one plain stitch kept between them rather than worked side by side: the single stitch between the two increase points is what becomes the base of the thumb opening, and keeping it consistent round after round is what keeps that opening a clean, round shape instead of a lopsided slit.
Placement matters as much as the increase count. Before starting the gusset round, try the unfinished hand section on if you can, checking where your own thumb naturally sits relative to the cuff. The pattern's stated round count is a starting point based on an average hand, and shifting the gusset's start by a round or two either direction is a completely normal adjustment once you've checked it against your actual hand rather than trusting the number blindly.
When you get to separating the thumb stitches onto scrap yarn, resist the urge to skip that step and just keep working straight through the gusset stitches as part of the hand. Holding them separately is what lets the thumb be worked afterward at its own gauge and length, sized to the actual thumb rather than being awkwardly folded into the surrounding hand fabric.
Rounding the top smoothly
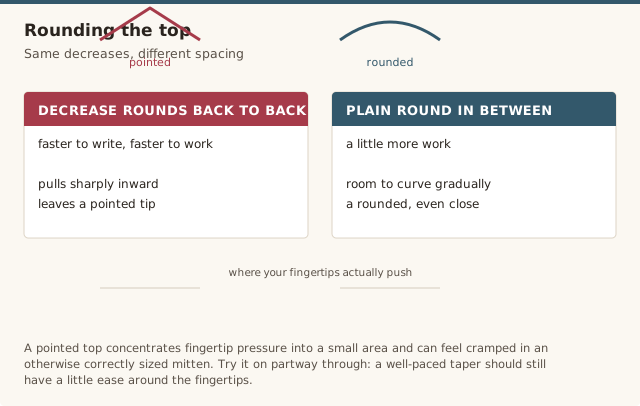
A lot of quick mitten patterns shape the top by working several decrease rounds back to back, which is faster to write and faster to work, but it produces a noticeably pointed tip rather than a smooth, rounded close. Spreading the same total number of decreases across more rounds, with a plain round worked in between each decrease round, gives the fabric room to curve gradually rather than pull sharply inward all at once.
This matters more for mittens than it might seem, since the top of a mitten sits right where your fingertips actually push against the fabric when your hand is inside a glove or coat pocket. A pointed top concentrates that pressure into a small area and can feel oddly cramped even in a mitten that's otherwise sized correctly, while a rounded top distributes the same fingertip space more evenly.
If you're not sure whether your decrease spacing is gradual enough, try the unfinished mitten on partway through the top shaping. A well-paced taper should still feel like there's a small amount of ease around your fingertips at this stage, since the remaining decrease rounds will continue narrowing it further before the very end.
Adjusting for different hand shapes
The pattern's stated stitch counts are built around an average adult hand, but hands genuinely vary in more than just overall size, a wide, short-fingered hand and a narrow, long-fingered hand of the same total circumference can both need slightly different proportions to fit the same way. If your hand runs noticeably wide relative to its length, add 2-4 sts to the plain hand section before the top-shaping decreases begin, which gives extra room across the palm without changing how long the mitten runs from cuff to fingertip.
For a narrower or smaller hand, working one fewer round before the top decreases start (rather than removing stitches from the round itself) is usually a cleaner adjustment than reducing the stitch count, since it keeps the gusset math from the pattern intact while simply shortening the hand section slightly. Changing the actual stitch count instead can throw off the gusset's placement relative to the sides of the hand.
Men's and women's hands on average differ enough in both circumference and finger length that it's worth treating this pattern's S/M/L sizing as a genuine starting range rather than three fixed options. Measuring the actual intended wearer's hand and comparing it directly against the pattern's stated finished measurements, rather than guessing a size from clothing size alone, avoids most of the fit problems that show up after the mittens are already finished and seamed.
Fit and thumb-gusset mistakes
Fix: check the pattern's stated hand circumference against an actual hand measurement before starting, and add a few stitches to the plain-stitch hand section if needed, not just to the cuff.
Fix: place the thumb gusset increases starting at the row specified relative to the cuff, and check gusset placement against your own hand by trying the unfinished piece on partway through.
Fix: work the cuff in a genuinely stretchy ribbed stitch (front-post/back-post) rather than plain single crochet, which has much less give.
Fix: spread the decrease rounds specified over several rounds rather than doing them all at once, which is what produces an unwanted point.
Fix: count total rounds on each mitten rather than trusting visual comparison, since tension can drift slightly between the two, especially if made on separate days.
Our pick for warmth
Patons Classic Wool Worsted
A genuine wool-blend with real warmth and some natural water resistance, worked at a firm gauge, gives these mittens meaningfully more cold-weather performance than an all-acrylic substitute, while still being manageable to hand wash and dry.
View on Amazon →Crochet mittens FAQ
What yarn is warmest for winter mittens?
A worsted-weight wool or wool-blend yarn is the warmest practical choice, since wool retains warmth even when slightly damp, unlike pure acrylic. A blend that includes a small percentage of acrylic alongside the wool adds some machine-washability without giving up much of the wool's warmth.
How do I size the pattern for different hand sizes?
Measure the actual hand circumference around the widest part of the palm and compare it to the pattern's stated finished measurement, adding or removing stitches from the plain-stitch hand section (not just the cuff) in multiples of the stitch repeat if the fit needs adjusting. The thumb gusset's placement relative to the cuff should stay proportionally the same even when the overall size changes.
Can these be made with a lining for extra warmth?
Yes, a separate fleece or thin wool lining cut to the mitten's inner shape and hand-stitched in along the cuff edge adds significant extra warmth for genuinely cold climates, without changing anything about the crochet construction itself.
How do I keep the cuff from sliding down the wrist?
Work the cuff in a genuinely stretchy ribbed stitch (front-post/back-post double crochet) rather than plain single crochet, and size it to sit snugly rather than loosely against the wrist. A ribbed cuff has much more elastic recoil than a plain-stitch cuff of the same stitch count.
How much yarn does one pair take?
About 150-180 yards of worsted-weight yarn for an average adult-size pair, though hand size and cuff length both affect the total, so it's worth having a little extra on hand if you're making a larger size.
Is this a good first thumb-gusset project or is there an easier starting point?
A thumb gusset is a genuinely useful skill to learn, and mittens are one of the more forgiving places to learn it since the gusset only needs to accommodate a thumb rather than the more complex shaping a glove's individual fingers require. If you want an even gentler introduction first, practicing the increase-and-hold technique on a small swatch before starting the full pair is a reasonable warm-up.
CrochetGuides is a participant in the Amazon Services LLC Associates Program. As an Amazon Associate we earn from qualifying purchases, at no extra cost to you.