Crochet Advent Calendar Pattern (Mini Stocking Garland)
Twelve tiny crochet stockings, strung on a garland, each one ready to fill with a small treat.
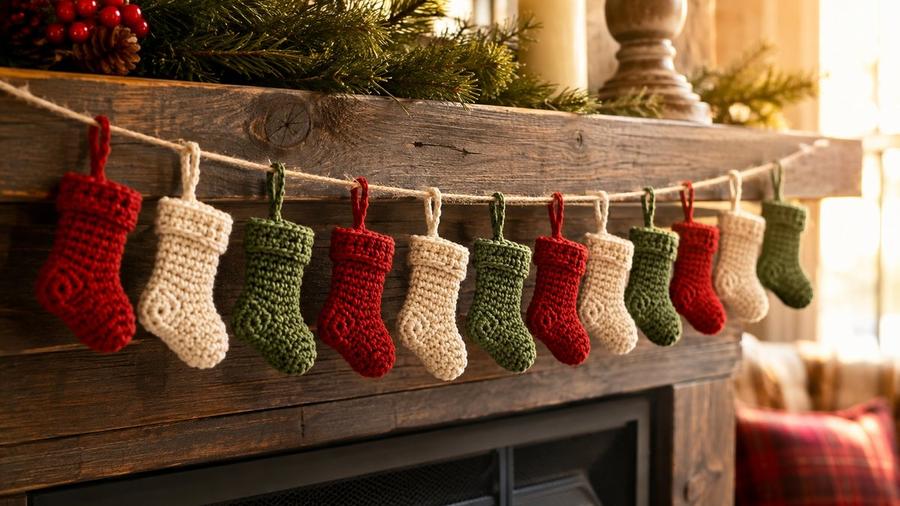
Every year around late October, my students start quietly panicking about what to make for Christmas, and the advent calendar is the project that finally gives them a manageable answer. It began in one of my classes when a student couldn't face a full-size stocking but still wanted something festive to hang. We scaled the idea down to these tiny stocking pouches, each one just big enough for a wrapped candy or a folded note, and strung a dozen of them on twine. The whole thing came together over a couple of relaxed evenings, and the moment she hung it in her hallway, half the class wanted the pattern. It's become one of my favourite December makes — quick to repeat, endlessly customisable, and it turns a countdown into something you made with your own hands.
What I love about this one is that the hard part isn't hard — it's just twelve of the same tiny stocking, one after the other, each one a chance to get a little neater. By stocking five or six, most people have the rhythm down and stop looking at the pattern entirely. It's a project that sneaks practice in under the guise of a festive decoration, and by the end you've quietly made a dozen little pouches without ever feeling like you were drilling a technique.
What you need
- Worsted or DK weight yarn in 3 alternating colors (red, cream, green work well)
- 4.0–4.5mm hook
- A length of twine, cotton cord, or ribbon for the garland base
- Yarn needle
- Small clothespins or a needle and thread to attach each stocking to the garland
One mini stocking (repeat 12 times)
Steps
- Chain 8. Work sc in the 2nd chain from hook and each chain across. (7 sts) Chain 1, turn.
- Work 3 rows even in sc.
- Row 5 (heel/toe corner): work 2 sc in the first stitch, sc across. (8 sts) Chain 1, turn.
- Row 6: sc across evenly.
- Row 7 (toe point): sc2tog, sc to last 2 sts, sc2tog. (6 sts) Fasten off, leaving a tail.
- Fold the piece in half along its length and whip-stitch the two side edges together, leaving the top open, to form a tiny stocking pouch.
Hanging loop
Steps
- With the same or a contrast color, chain 6 at the top back corner of the stocking.
- Slip stitch back into the same spot to form a small loop, fasten off, and weave in ends.
Assembling the garland
Steps
- Make 12 stockings total (or as many as you'd like), alternating colors so no two neighbors match.
- Lay out your twine or ribbon to the length you want the garland to hang.
- Thread each stocking's hanging loop onto the twine, or clip it on with a small clothespin, spacing them evenly.
- Optional: number each stocking with fabric marker, a small tag, or a different stitch pattern so it works as a true 1–24 or 1–12 countdown.
A demonstration of making small numbered pockets, useful for seeing how each piece is sized and finished.
Yarn and colour choice
Three alternating colours — red, cream, and green — give the garland its rhythm, but the specific yarn matters more than the palette. A worsted or DK weight in a smooth acrylic or cotton keeps the little stockings crisp and firm, so they hold their pouch shape instead of flopping flat against the twine. Keep all three colours the same weight and fibre, because a DK stocking next to a worsted one will look a size out even if the stitch count is identical. If you want a softer, more traditional feel, a gently heathered cream against solid red and green adds depth without busyness. See yarn weight explained if you're mixing leftover yarns of different weights.
Numbering and personalising
To turn a garland into a true countdown, each stocking needs a number, and there are gentler ways to add it than a fabric marker that can bleed or rub off. Small paper or card tags looped over the twine are the easiest to read and can be swapped out each year, while embroidering a number onto the stocking front with a contrast thread gives a permanent, heirloom feel. If you'd rather keep it subtle, vary the stocking pattern itself — a different cuff colour or an extra stripe for each day — so the sequence is built into the crochet rather than stuck on top. Whichever you choose, add the number before filling, so you're not fiddling with tags around a hidden chocolate.
A garland that hangs straight
A dozen pouches on one string will sag unevenly unless you space and secure them deliberately. Thread each hanging loop onto the twine, then tie a small knot on either side of each loop, so the stockings stay put instead of sliding together into a clump. If the garland dips in the middle, the weight isn't balanced — space the stockings evenly and hang the ends at matching heights, or add a second small nail in the centre for a longer run. Because each stocking is light, the whole thing hangs easily from two small hooks, but filling them with heavier treats will pull the line down, so keep the contents light or support the centre. Our blocking guide can help you square up any stockings that came out a little skew before you string them.
Common mistakes & fixes
Fix: your tension drifted between repeats. Check each stocking against the first one as you finish it, and count the rows — a consistent seven stitches across three even rows keeps them uniform.
Fix: the side seams weren't closed fully. Whip-stitch both side edges right down to the toe point, leaving only the top open, so nothing slips out.
Fix: they weren't secured to the twine. Tie a small knot on each side of every hanging loop so each stocking stays where you put it rather than drifting.
Fix: it was anchored through a single stitch. Work the chain loop through two stitches of the top back corner before slip-stitching it closed, so the weight is spread.
Fix: the yarns are different weights or fibres. Match all three colours in weight and fibre so every stocking behaves the same, and keep the colour order consistent down the line.
Fix: the marker isn't holding on the yarn. Use a fabric paint designed for fibre, embroider the number, or add a removable card tag instead — all last longer than a plain felt-tip.
Frequently asked questions
Can I make 24 for a full December countdown?
Yes — the mini stocking is quick enough to repeat 24 times; just plan for roughly double the yarn and time.
What can I put inside each stocking?
Wrapped candies, a small ornament, a folded note with an activity for the day, or a tiny toy all fit well.
Do I need to number them?
Only if you want a strict day-by-day countdown — without numbers, it still works beautifully as a general holiday garland.
How long does a crochet advent calendar take to make?
At a relaxed pace, each mini stocking takes about 10 to 15 minutes, so a dozen can be finished over a couple of evenings and a full set of 24 over a week of casual crocheting.
What size are the mini stockings?
Each stocking works up to roughly 2–3in / 5–7cm tall, big enough for a wrapped candy, a small ornament, or a tightly folded note, while staying light enough to hang neatly on twine.
How do I store it after the season?
Take the stockings off the twine and stack them flat in a small box with a sheet of tissue paper between layers, so the pouches don't crease under weight. Empty the treats first, and keep the box somewhere dry so the garland is ready to hang again next December.
CrochetGuides is a participant in the Amazon Services LLC Associates Program. As an Amazon Associate we earn from qualifying purchases, at no extra cost to you.