Free Crochet Wall Hanging Pattern for Beginners
A boho wall hanging worked from a wooden dowel, with a textured bobble body and an optional fringe trim.
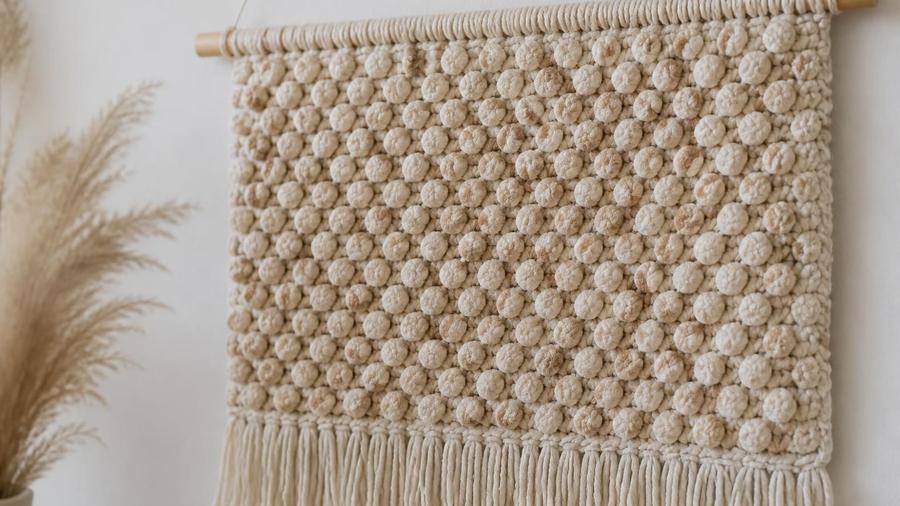
I still have the first wall hanging I ever made, a lopsided thing of single crochet and a branch I carried home from the park, and it has hung in every room I've lived in since. That's the quiet magic of a crochet wall hanging: it doesn't need to fit anyone, it doesn't need to be perfect, and it turns a blank wall into the warmest corner of the house in a single afternoon. In my twelve years of teaching, this is the project I hand to students right after their first scarf, because it stretches them just enough without ever leaving them stuck.
This crochet wall hanging pattern is built around three moves you probably already know. You work a row of loops straight onto a wooden dowel, then build a body of single and double crochet with a bobble row for texture, and finish with a fringe if you're in the mood. That's it. The only real tricks are spacing the loops evenly and keeping your tension relaxed, and I'll show you both.
Unlike a garment or a bag, a wall hanging carries almost no weight and gets no wear, which means the mistakes that sink other projects barely matter here. If a bobble sits a little crooked or the fringe isn't perfectly straight, the piece just looks handmade in the best possible way. That freedom is exactly why I love teaching it.
Materials
- 2 skeins worsted-weight cotton or wool-blend yarn (about 200 yards total, plus more for fringe)
- 5.0mm (US size H) crochet hook
- A wooden dowel or straight branch, 12in / 30cm long and about 1/2in / 1.3cm thick
- Scissors
- Yarn needle, for weaving in ends
Abbreviations (US terms)
| Abbr. | Means |
|---|---|
| ch | Chain |
| sc | Single crochet |
| dc | Double crochet |
| st(s) | Stitch(es) |
| bobble | 5 dc worked into the same stitch and closed together at the top |
See our abbreviations glossary for the full list including UK terms, and our basic crochet stitches guide if the bobble is new to you.
Gauge
16 sc and 18 rows measures about 4in / 10cm square with a 5.0mm hook and worsted-weight yarn. A relaxed, even tension keeps the bobbles plump and stops the piece pulling in at the edges.
Notes
- Written in US terms, worked flat in rows from a dowel rather than in the round.
- The 50 foundation stitches spread evenly across a 12in / 30cm dowel so the fabric sits about the same width as the rod.
- The bobble counts as one stitch; it's worked into a single stitch and closes into a single stitch on top.
- Leave the top loops a touch loose so you can slide them along the dowel to space them evenly before the body gets heavy.
Pattern
Ch 1, then work 50 sc around the dowel, enclosing the rod inside each stitch. To do this, insert the hook over the rod from front to back, yarn over, pull up a loop, then finish the sc as normal. (50 sts) Ch 1, turn.
Sc in each st across. (50 sts) Ch 1, turn.
[4 dc, bobble in next st] repeat to end. Work the bobble by drawing up 5 dc into the same stitch, leaving the last loop of each on the hook, then yarn over and pull through all loops and ch 1 to close. (50 sts) Ch 1, turn.
Sc in each st across. (50 sts) Ch 1, turn.
Repeat rows 3 and 4 until the piece measures about 10in / 25cm from the top of the dowel, ending on a Row 4. Fasten off, leaving a long tail for the hanging loop.
Cut a 20in / 50cm length of yarn, fold it in half, and tie the loose ends around both ends of the dowel — or around the rod just in from each end — to make the top loop for hanging. Tug to check it's secure before you trust it with the whole piece.
Cut strands about 10in / 25cm long and attach them two at a time across the bottom edge with a lark's head knot, spacing them evenly along the row. This is optional, but it gives the piece that finished, boho weight at the bottom.
Weave in any remaining ends along the back of a few stitches and trim the fringe even. Hang it up, step back, and admire your handiwork.
Yarn & colour for a boho look
This is a project where the yarn does the decorating, so pick something with a little body and a little texture. Cotton is my usual recommendation: it holds its shape, the stitches sit crisply against the wall, and those bobbles stay plump instead of flattening out over time. A wool blend is the other lovely option, softer and bouncier, though it can fuzz a touch with handling. Whatever you choose, steer clear of anything too slippery or too fuzzy, because both will blur the exact texture you worked hard to build. If you're unsure how thickness changes the feel, our yarn weight guide walks through it with real swatches.
For colour, a boho look leans into warm, earthy tones: natural cream, terracotta, mustard, sage, and a dusty clay. You don't need to overthink it, though. A single skein in one calm colour lets the bobble texture do all the talking, and it's the version I reach for most. If you want a little more movement, swap colour every few rows to make soft stripes, or carry two strands together in different shades for a marled, hand-spun feel. A wall hanging is forgiving of colour the way it's forgiving of everything else, so let yourself experiment.
Choosing the dowel or rod
The dowel is half the look of this piece, so it's worth a minute of thought. A plain wooden dowel from a craft or hardware shop, 12in / 30cm long and about 1/2in / 1.3cm thick, is the easy, dependable choice — sand the cut ends smooth so they don't snag your yarn. My favourite version, though, is a straight branch from the garden. A branch brings a little irregularity and warmth that a shop dowel can't match, and it costs nothing. Just make sure it's dry and solid, sand off any rough or sharp spots, and give it a wipe so loose bark doesn't shed onto your cream yarn.
The thickness matters more than you'd expect. A rod that's too thin will bow under the weight of a long body, and a rod that's too thick makes those top loops saggy and loose. Around 1/2in / 1.3cm hits the sweet spot for a beginner. If you want something more polished, a copper or brass curtain rod works beautifully too, and the warm metal glints against natural yarn the same way wood does.
Adding fringe
Fringe is the fastest way to make a simple body look intentional, and it's genuinely easy. Cut your strands roughly twice as long as you want the finished fringe to be, since each strand folds in half. To cut a whole batch at once, wrap the yarn around a book or a piece of cardboard, then snip along one edge — you'll get a tidy pile of matching lengths in seconds instead of measuring and cutting one by one. For each knot, fold a strand (or two strands together for a fuller look) in half, push the folded loop through a stitch at the bottom edge, and pull the loose ends through that loop to tighten. That's a lark's head knot, and it's the only knot you need.
Space the knots evenly across the bottom row, then trim them all to the same length once they're in place. The trick to a straight fringe is trimming with the piece laid flat, cutting from the outside edge inward a little at a time rather than trying to line it all up by eye in one pass. If you enjoy the rhythm of it, our table runner pattern uses the same technique on a longer scale.
Styling & hanging it
Hanging is where this project becomes yours. The loop you tied onto the dowel slips straight over a picture hook or a small nail, and for most walls that's all it needs — the piece is light, so it doesn't ask much of the wall. In a rented place, a small adhesive hook does the job without leaving a mark. Where you put it matters too: a wall hanging reads best at eye level, above a sofa, a bed, or a console table, and it loves company. I hang mine in a loose cluster with a macrame piece a friend made and a small shelf of plants, and the mixed textures do more for the room than any single thing on its own.
Before you hang it, give it a quick block. Pin the piece flat, mist it lightly until just damp, and let it dry completely — this evens out the bobble rows and stops the edges from curling so the whole thing lies flat against the wall instead of bowing. Our guide to blocking crochet walks through it if you've never done it before. Once it's up, a gentle shake now and then keeps the dust off, and a lint roller does the rest.
Cotton worsted-weight yarn, 3-pack
Soft cotton in warm, earthy tones that suits this boho wall hanging and leaves plenty over for the fringe.
View on Amazon →Common mistakes & fixes
Frequently asked questions
What yarn is best for a crochet wall hanging?
Cotton and wool-blend worsted-weight yarns are best, since they hold their shape and show off textured stitches like bobbles. For a soft, drapey look choose cotton; for warmth and bounce choose a wool blend. Avoid slippery or very fuzzy yarns, which blur the texture.
How do I attach the yarn to the wooden dowel?
Work a row of single crochet directly around the dowel. Insert the hook over the rod from front to back, yarn over, pull up a loop, then complete the single crochet. This creates loops that slide along the dowel so you can space them evenly before the piece gets heavy.
How do I make a crochet wall hanging hang straight?
Space your foundation single crochets evenly across the dowel and tie the hanging loop around the rod's centre of balance. If the piece still leans, slide a few of the top loops a fraction one way or the other until the bottom edge hangs level.
How much yarn do I need for a crochet wall hanging?
About 200 yards of worsted-weight yarn covers the body of this pattern, and the fringe adds another 60 to 80 yards, so two skeins of a 100-yard ball gives you a little breathing room. If you plan a long, dense fringe, buy a third.
Can I use a branch from outside instead of a dowel?
Yes, and it's one of the nicest parts of this project. Choose a dry, straight branch about 12in / 30cm long and 1/2in / 1.3cm thick, sand off any rough or sharp spots, and give it a wipe down so loose bark doesn't rub off on your yarn.
How do I add fringe to a crochet wall hanging?
Cut strands roughly twice as long as you want the fringe, fold each in half, push the folded loop through a stitch at the bottom edge, and pull the two loose ends through that loop to form a lark's head knot. Attach the bundles evenly across the row, then trim them straight once all are in place.
How do I block a crochet wall hanging?
Pin it flat on a blocking mat or a folded towel, mist it with a spray bottle until just damp, and leave it to dry completely. Blocking evens out the bobble rows and straightens the sides so the piece hangs flat against the wall instead of curling.
CrochetGuides is a participant in the Amazon Services LLC Associates Program. As an Amazon Associate we earn from qualifying purchases, at no extra cost to you.