Free Crochet Placemat Pattern (Flat & Sturdy)
A set of rectangular crochet placemats sized to a standard dinner plate, worked flat and dense so they lie truly flat instead of curling at the edges.
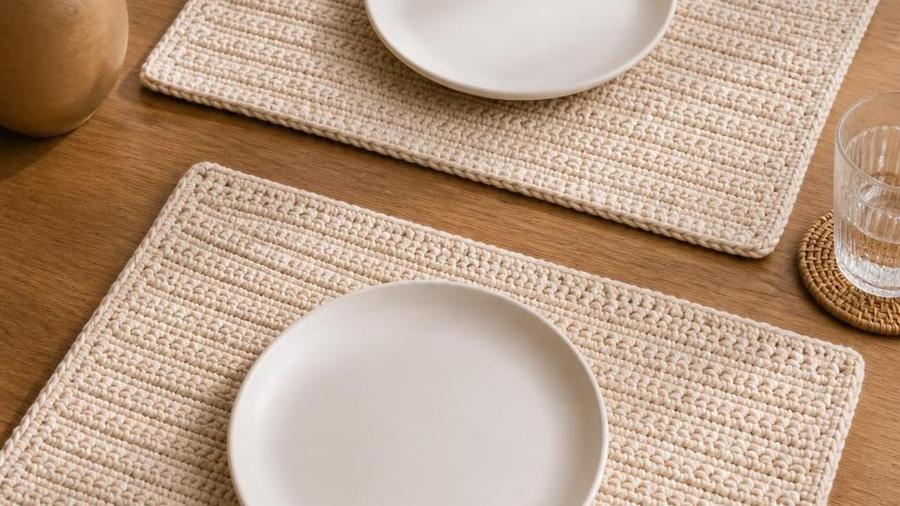
My first crochet placemat looked perfectly flat the moment I finished the last stitch and set it on the table. By the following week, both long edges had curled upward into soft rolls, turning what was meant to be a flat dining surface into something a plate would actually wobble on if set too close to either edge. The fabric itself hadn't done anything wrong exactly, it just had no border round to hold that final edge in place, and open, uncontrolled edges on a dense rectangle of crochet fabric will curl given enough time, almost regardless of the stitch used for the body.
This pattern is built specifically to avoid that: a dense, low-profile stitch throughout for a stable surface, sized against an actual measured dinner plate rather than a generic size guess, and finished with a stabilizing border round that keeps the whole piece genuinely flat on the table rather than curling within the first few uses.
Placemats are also one of the more practically useful things you can make for your own kitchen table, since unlike a decorative-only piece, these get real daily use, which means durability and washability matter here in a way they simply don't for something purely ornamental. Every choice in this pattern, the stitch density, the yarn fiber, the border, is made with that everyday functional use in mind rather than purely for appearance.
Materials
- About 200–250 yards of worsted-weight cotton yarn per placemat
- 4.5-5mm hook
- Yarn needle, scissors, measuring tape
Abbreviations (US terms)
| Abbr. | Means |
|---|---|
| ch | Chain |
| sc | Single crochet |
| rsc | Reverse single crochet |
See our abbreviations glossary for the full list including UK terms.
Notes
- Worked flat in rows, in a dense worsted-weight cotton yarn for structure and washability.
- Measure an actual dinner plate from your own set before deciding on the final dimensions.
- The border round is what prevents curling, don't skip it even if the rectangle looks flat before it's added.
Pattern
Ch 43 (or the length needed for your measured size, in a multiple that suits your stitch pattern), turn.
Row 1: sc in 2nd ch from hook and each ch across, turn. Rows 2 onward: ch 1, sc in each st across, turn. Repeat until the rectangle reaches your target width (roughly 12in for a standard plate), counting stitches at the start of every row to keep both edges straight.
Without turning at the end of the last row, work sc evenly around the entire outer edge of the rectangle, working 3 sc into each corner stitch to turn the corner smoothly. Join with a slip stitch, or continue with a round of reverse single crochet directly over the sc border for a slightly more finished, rope-like edge.
Weave in all ends securely. If any curling remains after the border round, dampen the piece lightly and block it flat under a towel with a few heavy books on top until fully dry.
Keeping it genuinely flat
The border round is doing more work than it might look like from the outside. Every row of the main body ends in a raw, unconstrained edge, and a stack of those edges along both long sides of a dense rectangle naturally wants to curl inward as the fabric relaxes after being worked under tension on the hook. A round of single crochet or reverse single crochet worked directly around that entire perimeter locks each of those raw edges into a continuous, tensioned loop, which is what actually holds the rectangle flat rather than the body stitch pattern alone.
Stitch choice for the body matters just as much as the border. A dense stitch like plain single crochet, or a similarly tight textured stitch, produces fabric with much less inherent stretch and drape than a lacier, more open pattern, and that lack of give is exactly what you want in something meant to sit flat and stable under a plate. An open, lacy stitch pattern might look attractive as a decorative doily, but it's the wrong choice functionally for something that needs to support real weight without shifting.
If a finished placemat still shows some curl at the corners specifically, rather than along the long edges, it usually means the corner stitches during the border round weren't increased enough to let the border fabric turn the 90-degree angle without pulling. Adding one extra stitch into each corner during the border round, beyond what felt necessary, is a small adjustment that usually resolves a stubborn corner curl.
Sizing to your own table and plates
Generic placemat size guides exist, but the single most useful thing you can do before starting is measure an actual plate from your own dinnerware set rather than trusting a stated "standard" size. Plate diameters vary more than most people expect between different dinnerware lines, and a placemat sized for a smaller plate can look visibly undersized once your actual larger dinner plates are set on it.
Beyond the plate itself, think about what else typically sits on the table at the same time, a glass, a folded napkin, silverware laid to either side, since a placemat sized to just barely fit the plate alone often feels cramped once the rest of a table setting is in place. Adding an extra inch or two of width beyond the bare plate measurement usually gives a noticeably more comfortable, less crowded table setting without making the finished piece impractically large.
If your table itself is on the smaller side, it's worth measuring the available space per seat before committing to a size that works well for the plate alone. A placemat that fits the plate perfectly but overlaps a neighboring seat's placemat at a shared table isn't actually solving the problem it was meant to solve.
Stitch and color variations
Plain single crochet worked in rows is the most reliable choice for a first placemat, but once you're comfortable with the basic construction, a slightly textured dense stitch, like half double crochet worked through the back loop only, adds visual interest while keeping essentially the same flat, stable structure. Avoid anything genuinely open or lacy for the body, since that's the one substitution that undermines the whole point of a functional placemat regardless of how carefully the border round is worked.
Two-color striping is an easy way to make a set feel more considered without adding any construction difficulty, simply changing color at the start of a row rather than mid-row keeps the color-change tails manageable and the stripe edges clean. A single accent stripe near each short end, rather than an all-over striped pattern, tends to read as more deliberately designed than evenly spaced stripes across the whole piece.
If you're making a full set for gifting, working every mat in the exact same stitch count and color sequence, rather than treating each one as a slightly different experiment, is worth the extra discipline. A set of placemats gets compared to each other in a way a single decorative piece never does, and small inconsistencies that would be unnoticeable in isolation become obvious once four mats are laid side by side on the same table.
Shape and durability mistakes
Fix: work a stabilizing border round of single crochet or reverse single crochet around the entire finished rectangle, and block it flat while damp if curling persists.
Fix: use a dense stitch like single crochet rather than a lacier or more open stitch pattern, which is better suited to a decorative piece than a functional one.
Fix: count stitches at the start of every row against the target width, since a slowly drifting stitch count over many rows is what produces uneven corners.
Fix: measure an actual plate before deciding on dimensions rather than using a generic size, since plate sizes vary more than expected.
Fix: use cotton yarn specifically, and note care instructions (cold wash, lay flat to dry) directly on the piece's care routine, since these are meant for regular use and washing, unlike a decorative-only piece.
Our pick for a table-ready finish
Lily Sugar'n Cream Cotton Yarn
A sturdy, widely available worsted-weight cotton that holds its shape through repeated machine washing and resists pilling far better than a synthetic blend, making it a genuinely practical choice for something that sits under a plate every day.
View on Amazon →Store finished placemats flat rather than rolled or folded between uses, since a cotton fabric held in a tight fold for extended periods can develop a stubborn crease that's harder to block out than the original edge curl ever was. A shallow drawer or a flat stack in a linen closet keeps a finished set ready to use without adding any extra maintenance to your routine.
Placemat FAQ
What size should I make for a standard dinner plate?
About 12x17in comfortably fits a standard 10-11in dinner plate with room around the edges for silverware, but it's worth measuring an actual plate from your own set before starting, since plate sizes vary more between dinnerware sets than most people expect.
What's the best yarn for something that gets washed regularly?
A sturdy worsted-weight cotton yarn, since cotton holds its shape through repeated machine washing far better than acrylic or wool, and doesn't develop the pilling that shows up quickly on a surface that gets this much daily contact and friction.
How many placemats should I make for a set?
Four is the most common set size for a typical household table, though matching your actual seating count makes more sense than defaulting to four automatically. Making one extra beyond your regular seating count is a reasonable buffer for guests.
Can the pattern be adjusted for a round placemat instead of rectangular?
Yes, working in the round from a central point with the same dense stitch and a stabilizing border round applies just as well to a round shape, though you'll size the diameter against the same actual-plate measurement this pattern recommends for the rectangular version.
What are the washing and care instructions?
Machine wash cold on a gentle cycle and lay flat to dry rather than using a dryer, which helps the cotton fabric keep its shape and flatness over repeated washes. Avoid high heat, which can cause cotton yarn to shrink unevenly.
Can this be matched with the site's other home decor patterns?
Yes, working a set of placemats in the same cotton yarn and colorway as our coasters or table runner pattern creates a coordinated table setting for very little extra planning, since all three use the same dense, washable stitch approach.
CrochetGuides is a participant in the Amazon Services LLC Associates Program. As an Amazon Associate we earn from qualifying purchases, at no extra cost to you.